Build your first smart contract on Ethereum
With this article, you will find out how to create your first smart contract with Solidity and run your code online or on your local environment. So let’s set off on a journey and have fun!
What’s all the fuss about?
There are many different Ethereum programming languages currently available like Solidity, LLL, Vyper or Serpent. Each of these languages has its pros and cons and particular use. For our purposes, Solidity will be a good choice, because it is a great balance between simplicity of code and the ability to create complex systems. If you’re hungry to learn more about the differences between the most popular Ethereum languages, see details in this article.
Solidity is contract-oriented language. What does it mean? The code in Solidity is encapsulated in smart contracts. A conception of smart contracts is very similar to the contract in the real world. It is like an agreement between two or more parties in the form of code.
In practice, smart contracts are very similar to object-oriented classes. They can call another smart contract, create and use objects of another class. A contract can have variables and functions and store some data. What makes smart contract different from a standard object is the fact that after you deploy a contract to Ethereum, it’s immutable and stays permanently on the blockchain. No one can modify or update this code, it is impossible to add additional functions to it. If there is a serious defect, there is no way to fix it after deployment. The only option is to deploy a new contract and tell your users to change the used contract address to the new one. It sounds like a big failure but it is also a feature, really. A smart contract mirrors a real contract, a code is a digital law. You can be sure that this contract will be exactly the same every time you call a function. There is no place for unexpected behavior or result. That’s why it is essential to consider all known security issues and optimize your code before you locate it on the blockchain. The best bet is to try out your code before you use it on main Ethereum blockchain.
Remix – when you are scared about installing anything on your machine
The easiest way to try out Solidity, without installing any tools, is using Remix. It is open source Ethereum IDE running straight in the browser. It helps you start writing, testing, debugging, and running smart contracts. When you open Remix IDE, you will notice that there is a sample smart contract already written for you. You can modify the prepared code, try to run below sample or implement your own. If you aren’t comfortable using the online version, you can download the source, compile and run it as a private version on your computer.
It’s time for some code
Since contracts are such type of agreement, you can include there some immutable instructions on how something should look like or behave. In this example, we will build a farm of chickens. Our farm will create chickens, and store them in contract storage. Let’s create a simple structure of our contract:
pragma solidity >=0.5.0 <0.6.0;

contract ChickenFarm {
}
With pragma directive, you can define the specific compiler version to be used for the current file. Solidity is still continuously developing language, and there is a high probability that part of your code will be depreciated in the newest versions.
Below pragma is a declaration of a contract, the basic unit, in which all variables and functions will be placed. To check if the farm contract is deployed properly on the blockchain you can declare checkStatus() function:
pragma solidity >=0.5.0 <0.6.0;

contract ChickenFarm {

    function checkStatus() public pure returns (string memory) {
        return 'Farm is working';
    }
}
Function checkStatus() is specified as public, so it can be called internally or via messages. It is also declared as pure what promise that function not to read from or modify any state in contract. After calling this function, it should return a string: Farm is working. Memory keyword is compulsory and creates a temporary variable, which lifetime is limited to a function call.
To create a genuine farm, there is a need to define a new type in the form of a struct. A struct may look like an object, but it isn’t, it’s only a bag for variables. For the sake of simplicity our chicken will have only two variables: id (unsigned int) and name (as a string):
struct Chicken {
    uint id;
    string name;
}
Then it is possible to initiate key-value pair for storing all created chicken:
mapping(uint => Chicken) chickens;where uint is a key and value is a specific chicken. To create new chicken, first declare a special counter variable for key:
uint public counter = 0;Use the following method to increment counter at every next function call, and then assign this key to a newly created chicken struct with name given in method parameter:
function addChicken(string memory name) public {
  counter += 1;
  chickens[counter] = Chicken(counter, name);
}
To verify if the method works properly, you can implement the getter method, which for given key id returns proper chicken’s data as a tuple:
function getChicken(uint id) public view returns (uint chickenId, string memory name) {
  return (chickens[id].id, chickens[id].name);
}
You may ask, why don’t just return a struct instead of the tuple? The answer is simple: you can’t. Solidity implements a struct only as a bag of variables, it isn’t a real object. When you try to return a struct, you will get an error:
TypeError: This type is only supported in the new experimental ABI encoder. Use “pragma experimental ABIEncoderV2;” to enable the feature.
Of course, you can use the mentioned pragma experimental ABIEncoderV2 to do this. However, it’s still an experimental solution so this isn’t recommended. For this reason, you are forced to return chicken’s data piece by piece, joined as a tuple.
This getter is declared as a view function, meaning it’s actually doesn’t change anything on the blockchain, only viewing the data without modifying anything.
To summarize – the whole code together from the above for clarity:
pragma solidity >=0.5.0 <0.6.0;

contract ChickenFarm {

  function checkStatus() public pure returns (string memory) {
    return 'Farm is working';
  }

  mapping(uint => Chicken) chickens;
  uint public counter = 0;

  struct Chicken {
    uint id;
    string name;
  }

  function addChicken(string memory name) public {
    counter += 1;
    chickens[counter] = Chicken(counter, name);
  }

  function getChicken(uint id) public view returns (uint chickenId, string memory name) {
    return (chickens[id].id, chickens[id].name);
  }
}
This is just a simple chunk of code to introduce the basics of Solidity, so remember this is not a safe code ready to production!
Let’s check it out
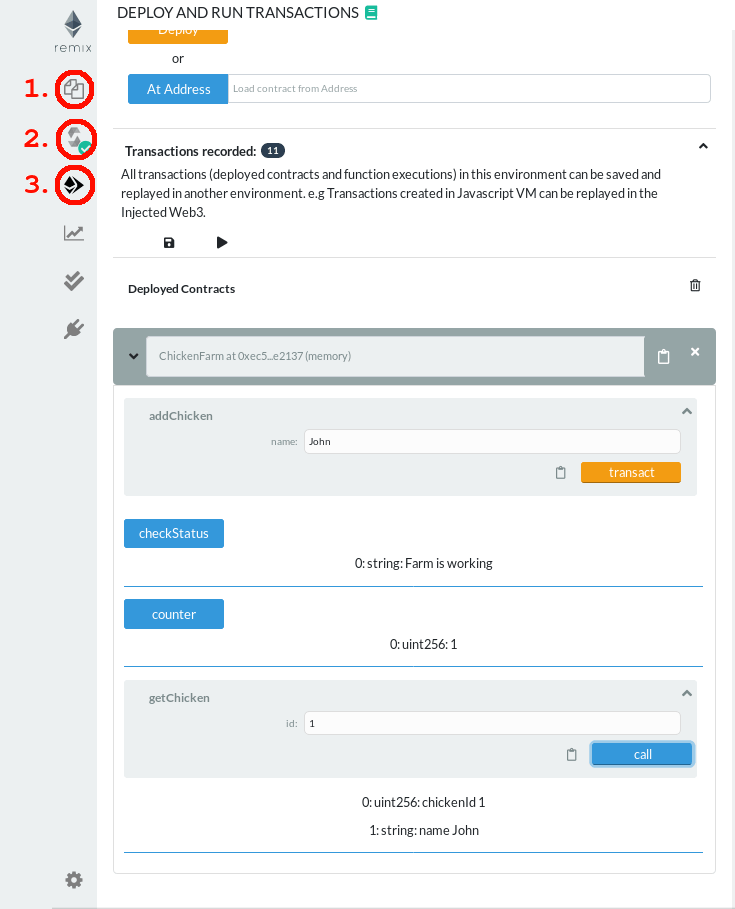
Don’t be such a chicken and try it yourself. You can simply play around with the above code with Remix. Below, in a few steps, you can see how to deploy and call some functions.
- Create a new file and paste the code.
- Compile your code.
- Deploy code on JavaScript VM with default settings.
After that, you can call functions and check how they work.
Box of sweets – when you need something more
One thing is for sure – when you try Solidity, you won’t stop writing smart contracts. Before you feel confident enough to deploy your code on the public blockchain, it’s good to practice more. So the next step is to set up a local environment to immerse yourself in Solidity forever. For this purpose, you will need a set of some tasty tools: Truffle and Ganache. The first one will allow you to create a basic structure of a project, but also develop, test and deploy your code. Truffle helps at every step in the application lifecycle management process.
A prerequisite for installing Truffle or Ganache is Node.js, as they are deployed as a node package. After installing npm it’s time to install the latest version of Truffle globally:
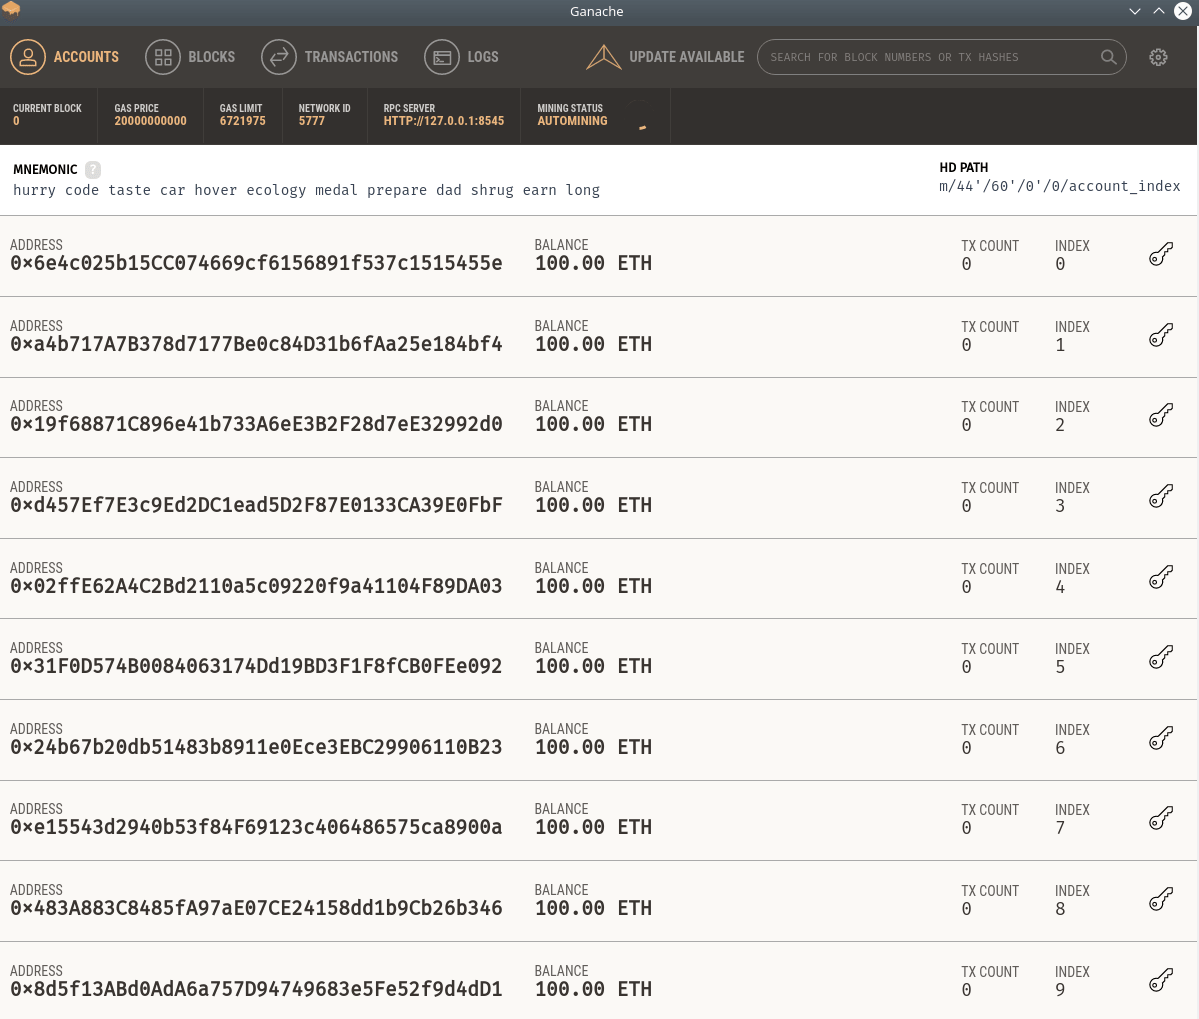
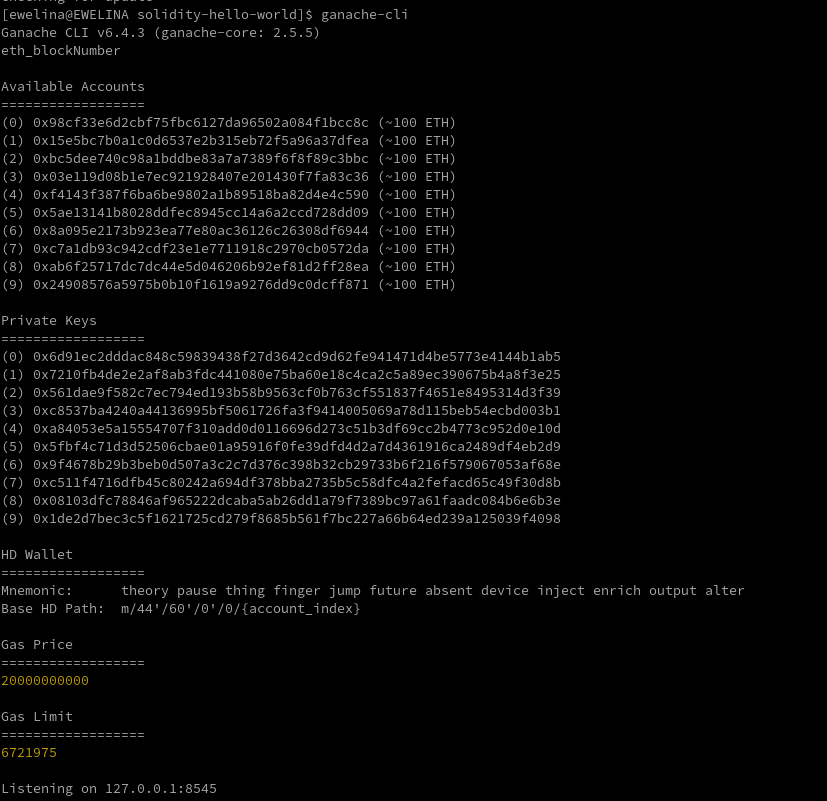
npm install -g truffleGanache is a simple tool that creates a personal Ethereum blockchain. It is attempting to mimic the main network, of course under specific conditions. In Ganache blocks are auto-mined because there are no miners. This means that all transactions are processed instantly. The main Ganache’s power is that you can perform all operations you would on the main blockchain without any real cost. For a start, it provides 10 accounts with 100 ether. There are available two versions of Ganache, one in the command line and second running as a desktop application. Feel free to choose version suitable for you.
You can download Ganache UI version from the official website or install Ganache command line version running:
npm install -g ganache-cliAfter install, you can run Ganache with command ganache or ganache-cli
If you want to play with Ganache and transfer some virtual Ether with provided accounts, you can use MetaMask. It is a browser plugin which allows you to interact with your local network. It is not needed in this tutorial, but it’s good to know that kind of tool exists, just for future reference.
IntelliJ support
To start a real coding adventure with smart contracts you need some programming tool. If you use IntelliJ just install Intellij-Solidity plugin. This plugin provides some basic features that supports syntax highlighting for imports, comments, classes, functions and types. That allows you to move freely in your code and focus on mastering the craft of programming in Solidity.
Putting everything together
These are all necessary tools! Next step is to use them to create and deploy a smart contract on your private blockchain node.
Create a new directory for your project and open it:
mkdir solidity-hello-world
cd solidity-hello-world/
Then you can use Truffle to create a base project structure:
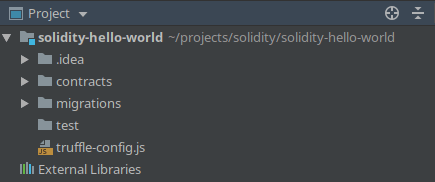
truffle initAfter executing the above command, you’ll have a backbone of a project with the following elements:
- contracts – it is a bag for Solidity contracts with extension
.sol - migrations – this directory contains scriptable deployment files
- test – all files for testing application and contracts should be right here
- truffle-config.js – this file has important configuration information that should be provided here is the network information to which Truffle should connect and deploy contracts.
To ensure that Truffle network is set to your local, check if in truffle-config.js is this part of the code:
module.exports = {
   networks: {
       development: {
           host: "127.0.0.1",
           port: 8545,
           network_id: "*",
      }
  }
}
and make sure that host and port are the same on which your local blockchain is listening on.
Then copy the code to a newly created contract file in contracts directory and deploy the contract to the local blockchain with the command:
truffle migrateAt this point, our journey ends. You have deployed your first contract on your local Ethereum blockchain node and you know something more how it is working under the hood. Certainly, after this short tutorial you already can see at least a few use cases for smart contracts, so no time to waste – try something by yourself. It’s not that hard, huh?
Let us know how it goes in the comments below!