Testing Your React App With react-testing-library
You’re aware of the importance of writing tests for your React app, but it can sometimes be challenging to get started. There are numerous questions about the approach, libraries, implementation, and more, which can be overwhelming and discourage us from writing tests. In this article, I aim to provide practical ways to begin writing tests for your React app, achieve good coverage, and keep the process simple and scalable.
To help illustrate this article, I’ve created a simple Todo App (because there are still not enough to-do-list apps). You can check it out here: https://github.com/adammruk/todo-list-testing. It is based on create-react-app, with Material UI. You can use this code as you like. It stores all data in your cookies, so you can safely play around with it.
Prepare the Environment and Write the First Test
Which testing library should you choose? In the React documentation officially recommended library is react-testing-library: https://testing-library.com/docs/react-testing-library/intro/
Let’s install it first:
npm install --save-dev @testing-library/react
or for yarn:
yarn add -D @testing-library/react
So we can start and write our first test for Login View. Below you can see a simple test we can write for it:
src/views/LoginView/LoginView.test.js
import React from 'react';
import { render } from '@testing-library/react'
import { LoginView } from 'views/Login/LoginView';

describe('LoginView' , () => {
  it('should render without errors', () => {
    render(<LoginView />)
  });
});
We can now run tests with yarn tests. What’s the result? Fails with:
FAIL  src/views/Login/LoginView.test.js
  LoginView
    ✕ should render without errors (99ms)

  ● LoginView › should render without errors

    TypeError: Cannot read property 'enqueueSnackbar' of undefined

      2 |
      3 | export const useSnackbar = () => {
    > 4 |   const { enqueueSnackbar } = useNotistackSnackbar();
Why is that? Because LoginView uses Snackbars, and Snackbars need to be wrapped SnackbarProviderto make it work. In the app, every view is wrapped with this Snackbar Provider (check out the App.js file), but here we render onlyLoginView. That’s why we are getting this error. So what we need to do is renderLoginViewwithSnackbarProvider:
import React from 'react';
import { SnackbarProvider } from 'notistack';
import { render } from '@testing-library/react'
import { LoginView } from 'views/Login/LoginView';

describe('LoginView' , () => {
  it('should render without errors', () => {
    render(<SnackbarProvider>
      <LoginView />
    </SnackbarProvider>)
  });
});
It should work now… Let’s see:
FAIL  src/views/Login/LoginView.test.js
  LoginView
    ✕ should render without errors (101ms)

  ● LoginView › should render without errors

    TypeError: Cannot read property 'history' of undefined

      51 | export const LoginView = ({ api }) => {
      52 |   const { showErrorSnackbar, showSuccessSnackbar } = useSnackbar();
    > 53 |   const history = useHistory();
Ok, now it’s missing<Route>provider because of this error withhistory. It looks like we need to render every provider we have in App.js, so we can run tests without any errors. Instead of doing it for every test, we can create a simple nice wrapper we can use to render our views:
export const renderApp = (Component) => {
  return render(
    <MuiPickersUtilsProvider utils={ DateFnsUtils }>
      <SnackbarProvider>
        <Router>
          { Component }
        </Router>
      </SnackbarProvider>
    </MuiPickersUtilsProvider>
  )
};
So in this file, we have all the providers we need to render every view in the app – for now, it should be enough. Now we can just replace the render method in our test:
describe('LoginView' , () => {
  it('should render without errors', () => {
    renderApp(<LoginView />)
  });
});
Will it pass?
PASS  src/views/Login/LoginView.test.js
  LoginView
    ✓ should render without errors (208ms)

Test Suites: 1 passed, 1 total
Tests:       1 passed, 1 total
Snapshots:   0 total
Time:        4.348s
Perfect! We have configured the environment, so we can focus on writing tests:)
Get into Real Testing
At first, we can just write down a list of paths and cases we can test LoginView:
- Submit with valid credentials:
- calls API with data from the form
- redirects to the app page
- display snackbar with a success message
- Submit with invalid credentials:
- does not call API with data filled in
- stays on the login page
- clears password field, but not email
- display snackbar with an error message
- With invalid input values:
- display required errors for email and password when empty
- display incorrect email address with malformed email input
- does not call API when I click the login button
If we start with such a list, we can convert it directly to our test file with an empty test:
describe('LoginView' , () => {
  describe('submit with valid credentials', () => {
    it.todo('calls api with data from form');
    it.todo('redirects to app page');
    it.todo('renders snackbar with success message');
  });

  describe('submit with invalid credentials', () => {
    it.todo('does not call api',);
    it.todo('stays on login page');
    it.todo('clears password field, but not email');
    it.todo('renders snackbar with error message');
  });

  describe('with invalid input values', () => {
    it.todo('display required errors for email and password when empty');
    it.todo('display incorrect email address on invalid email');
    it.todo('does not call api when i click the login button');
  });
});
By usingit.todo()we get a nice output on how many tests we have left:
Test Suites: 1 passed, 1 total
Tests:       10 todo, 10 total
Snapshots:   0 total
Let’s start with the last test case, with invalid values form, so we can learn the basics of testing views. The react-testing-library render method returns lots of utils we can use to find and test components of the page. All of them are described in this nice cheatsheet I use all the time: https://testing-library.com/docs/react-testing-library/cheatsheet
Every test will look similar:
- find button, field, or any other component using react-testing-library helpers
- if needed: fire events like click or change the input value
- check the expected result
So now we have all the knowledge to write our first real tests!
describe('LoginView', () => {
  let page;
  beforeEach(() => {
    page = renderApp(<LoginView />);
  });

  describe('with invalid input values', () => {
    it('display required errors for email and password when empty', async () => {
      const emailField = page.getByText(/email address/i).nextSibling.firstChild;
      const passwordField = page.getByText(/password/i).nextSibling.firstChild;
      const signInButton = page.getByText(/sign in/i);

      fireEvent.change(emailField, { target: { value: '' } });
      fireEvent.change(passwordField, { target: { value: '' } });
      fireEvent.submit(signInButton);

      await waitFor();
      expect(page.getByText('Email is required')).toBeTruthy();
      expect(page.getByText('Password is required')).toBeTruthy();

    });

    it('display incorrect email address on invalid email', async () => {
      const emailField = page.getByText(/email address/i).nextSibling.firstChild;
      const signInButton = page.getByText(/sign in/i);

      fireEvent.change(emailField, { target: { value: 'invalidemail' } });
      fireEvent.submit(signInButton);

      await waitFor();
      expect(page.getByText('Invalid email')).toBeTruthy();
    });

  });
});
If you think it seems a little bit complicated and confusing… You’re right! We will simplify and organize this in a minute, but first, let me explain what is going on here. We can take the first test and analyze it line by line:
beforeEach(() => {
    page = renderApp(<LoginView />);
  });
This block will be executed before everyit. It ensures that every test will start with the clean, initial state of the component we are testing. Inpagevariable, we have now all react-testing-library helpers we can use to find elements on this page.
const emailField = page.getByText(/email/i).nextSibling.firstChild;
const passwordField = page.getByText(/password/i).nextSibling.firstChild;
Here we search inputs in the rendered view. Why we cannot just use https://testing-library.com/docs/dom-testing-library/api-queries#bylabeltext for finding input? Well, we could, but in this example project we are using Material UI components, and with HTML generated by those components we cannot simply use it. Instead, we have to find a ‘path’ from the label (element we’ve found using getByText) to the native input element.
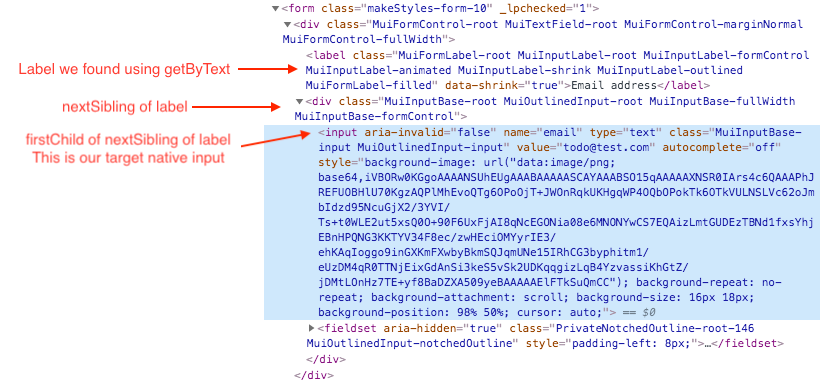
So if you’re using Material UI or a different UI library you may need to adjust this path. Now we can get back to our code.
const signInButton = page.getByText(/sign in/i).parentElement;
Here we have the same thing as in our inputs. We are searching the button by a label, and the parent of this label is the native button element. Next steps:
fireEvent.change(emailField, { target: { value: '' } });
fireEvent.change(passwordField, { target: { value: '' } });
fireEvent.click(signInButton);
This is quite understandable: we want to set for both email and password input empty string values to test form validation, and then click on sign in button to submit the form.
await waitFor();
Why do we need to wait? Because we are using the Formik library for handling form behavior, we will see all validation messages after the next render. Without this, we will check for errors before they get rendered – and test will fail.
So, at least we can check if there are expected errors somewhere on the page:
expect(page.getByText('Email is required'));
expect(page.getByText('Password is required'));
You may wonder if is it ok to put multiple expectations into one test. Well, the answer is of course: it depends. Usually, you should aim for one except for one test case, but for simpler tests like this one, it’s completely fine to use more, since it will not complicate the test. If the test will fail, it will still be easy to find out what went wrong.
Tests are working now, but they seem a little bit complicated and cluttered. You may notice repeated code and unclear structure. How to manage this? In brief, we will do two things:
- extract repeated code for inputs, buttons, etc to commonly shared classes and implement actions we can run
- move all page-specific objects and behaviors to separate class
Just take a look at how this shared class for input element could look like:
src/testUtils/elements/TextFieldElement.js
import { fireEvent, getByText } from '@testing-library/react';

export class TextFieldElement {
  constructor(container, label) {
    this.container = container;
    this.element = getByText(this.container, label).nextSibling.firstChild;
  }

  blur() {
    fireEvent.blur(this.element);
  }

  get value() {
    return this.element.value;
  }

  setValue(value) {
    fireEvent.change(this.element, { target: { value } });
    this.blur();
  }
}
So as we can see, by using this class we can ‘hide’ all the dirty stuff like searching for native input or changing its value, and just use nice and clean functions in tests making them much more readable. There’s also a similar class for the Button element.
The next step is to do similar things with our Login View. So again, we’ll hide in a class all components and actions we use in tests:
export class LoginViewPresenter {
  constructor(container) {
    this.container = container;
  }

  static render() {
    const { container } = renderApp(<LoginView />);
    return new LoginViewPresenter(container);
  }

  get emailInput() {
    return new TextFieldElement(this.container, /email address/i);
  }

  get passwordInput() {
    return new TextFieldElement(this.container, /password/i);
  }

  get signInButton() {
    return new ButtonElement(this.container, /sign in/i);
  }

  get emailRequiredError() {
    return getByText(this.container, 'Email is required');
  }

  get emailInvalidError() {
    return getByText(this.container, 'Invalid email');
  }

  get passwordRequiredError() {
    return getByText(this.container, 'Password is required');
  }

  async submitForm({ email, password }) {
    this.emailInput.setValue(email);
    this.passwordInput.setValue(password);
    this.signInButton.click();
    await waitFor();
  }
}
So we have here a static function render we can use to return a rendered view, with all helpers we defined in this class. We are also using helpers imported directly from react-testing-library, and pass a container to each one. Why? We will discuss it in the next part of the article:)
There’s only one thing left: apply this to our test file:
describe('LoginView', () => {
  let page;
  beforeEach(() => {
    page = LoginViewPresenter.render();
  });

  describe('with invalid input values', () => {
    it('display required errors for email and password when empty', async () => {
      await page.submitForm({ email: '', password: ''});
      expect(page.emailRequiredError).toBeTruthy();
      expect(page.passwordRequiredError).toBeTruthy();
    });

    it('display incorrect email address on invalid email', async () => {
      await page.submitForm({ email: 'invalidemail' });
      expect(page.emailInvalidError).toBeTruthy();
    });
  });
});
Look how much we reduce code in the test file! Now it’s clear what we are testing here, it’s much easier to read and we do not have to look at implementation details. This approach helps keep our test cleaner.
What do you think about this approach? If you have any questions, or maybe you found some difficult test cases, contact us at DO OK and one of our web development experts can help answer your questions.

-500x285.jpeg)